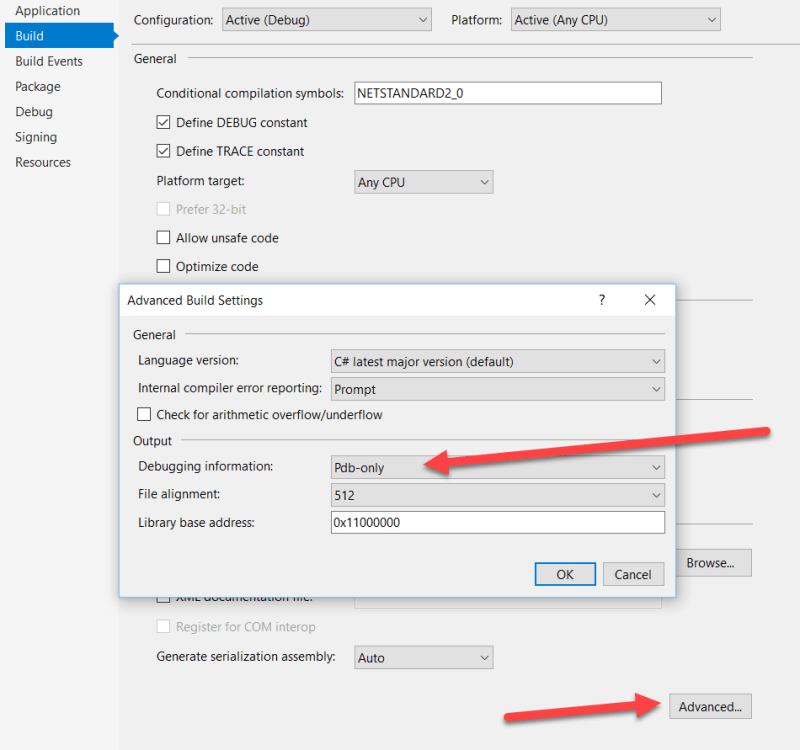
Ran into a funny one today. I was trying to debug my XF project and it wasn’t loading the symbols for the .NET Standard project so it was not hitting any of my breakpoints. I am currently using Visual Studio 2017.7.1. This was happening in my UWP project.
Obviously that’s not too helpful, but luckily I found some help in the Xamarin Forms as to the setting that was causing the problem. It has to do with the type of debugging information your build outputs. All I needed to do was change it to “Pdb-Only” and we were good to go. credit
Ok, now that we have a functioning app, the next thing we need to do is setup the hamburger menu that will allow the user to navigate to the various parts of the application.
In this app, we have a dashboard page that will list the favorite routes and stops for the user; a stops page that will show all the stops near the current location of the user; a routes page that will show the current location of the buses on the route; a donation page that will allow the user to make in-app purchases to support the app; a settings page that will allow the user to configure the app; an about page that displays app information and credits.
Create the Master Detail Page
In this, blog post, I am not going to get much into the styling of the apps and just concentrate on the functionality. I am going to post the results periodically and you can see any styling that I do there.
The master detail page has two sections: the master section and the detail section. The master section will contain the menu and the detail section will contain the menu selection. I don’t like all of the stuff that gets added in when you create a new MasterDetailPage in the “New Item” templates. I usually just add a new ContentPage and change the base class in the XAML and code behind. I also just declare the Master section contents in the MasterDetailPage itself.
The menu itself with be our app navigation. It will contain items for the dashboard, the route page, the stops page, donate, settings and about. Tapping on one of those items will navigate the detail section to that page.
The main thing that I want to call out in the above XAML is that the menu is implemented as a ListView and we are implementing each choice with a DataTemplate that will display as an icon and a label. The icon is determined by an IValueConverter that converts the MenuType enum to an image source (see my post on IValueConverters). I should also mention that we add a behavior to the ListView so that when an item is tapped, it executes an ICommand. I think it best if I document that in a separate post.
The MasterPage View Model
The viewmodel for the master page is actually pretty sparse. It has an ObservableCollection of MenuItemViewModels and the ICommand used to navigate when the user taps one of the menu items. Just to complete the picture, below is the class for the menu item view model and the master page view model.
    public enum MenuItemType
    {
        Dashboard,
        Stops,
        Route,
        Donate,
        Settings,
        About,
    }

    // BaseItemViewModel implements INotifyPropertyChanged and invokes it through
    // the SetProperty<> function.
    public class MenuItemViewModel : BaseItemViewModel
    {
        public MenuItemViewModel()
        {
        }

        public MenuItemViewModel(string title, MenuItemType menuItem, string navigationPath)
        {
            _title = title;
            _menuItem = menuItem;
            _navigationPath = navigationPath;
        }


        #region properties


        private string _title = null;
        public string Title
        {
            get => _title;
            set => SetProperty<string>(ref _title, value);
        }


        private MenuItemType _menuItem;
        public MenuItemType MenuItem
        {
            get => _menuItem;
            set => SetProperty<MenuItemType>(ref _menuItem, value);
        }


        private string _navigationPath = null;
        public string NavigationPath
        {
            get => _navigationPath;
            set => SetProperty<string>(ref _navigationPath, value);
        }


        #endregion
    }
Here is the important part of the master page view model:
    public class MvbMasterPageViewModel : BaseViewModel
    {
        private ILoggerFacade _logService = null;
        private INavigationService _navigationService = null;

        public MvbMasterPageViewModel(IEventAggregator messageBus, ILoggerFacade logService, INavigationService navigationService)
            : base(messageBus)
        {
            _navigationService = navigationService;
            _logService = logService;
            InitalizeMenuItems();
        }


        private void InitalizeMenuItems()
        {
            /// create menu items. The important thing is that we are defining a label for displaying
            /// in the menu, a menu type that will convert into a menu icon and a navigation path.
            /// repeat for each menu item. See below for a bit more info on Prism navigation.
            _menuItems.Add(new MenuItemViewModel("Dashboard", MenuItemType.Dashboard, $"{Pages.MyNavPage}/{Pages.Dashboard}"));
            // ...
        }


        private ObservableCollection<MenuItemViewModel> _menuItems = new ObservableCollection<MenuItemViewModel>();
        public ObservableCollection<MenuItemViewModel> MenuItems
        {
            get => _menuItems;
            set => SetProperty<ObservableCollection<MenuItemViewModel>>(ref _menuItems, value);
        }


        private DelegateCommand<MenuItemViewModel> _commandNavigate = null;
        public DelegateCommand<MenuItemViewModel> CommandNavigate
        {
            get
            {
                return _commandNavigate ??
                    (_commandNavigate = new DelegateCommand<MenuItemViewModel>(
                        async (menu) =>
                        {
                            if (menu != null && menu.IsEnabled)
                            {
                                try
                                {
                                    _logService.Log($"Navigating to {menu.NavigationPath}", Category.Info, Priority.None);
                                    await _navigationService.NavigateAsync(menu.NavigationPath);
                                }
                                catch (Exception e)
                                {
                                    Debug.WriteLine(e.ToString());
                                    _logService.Log(e.ToString(), Category.Exception, Priority.High);
                                    throw;
                                }
                            }
                        }));
            }
        }
    }
I just want to call out that we are using the dependency injection capabilities of Prism to automatically add in the required constructor parameters. Remember from the first post in this series, we set that up in our Application class.
The detail section of the master detail page is going to contain a custom navigation page. There isn’t much in there that is special, I just set the navigation bar background and text color.
Prism Navigation Service
Let’s revisit the Prism navigation system. If you remember from the previous post, the first thing we need to do is register our pages with the container in the RegisterTypes method in the Application base. Each page registration is associated with a string key value. When you want to perform a navigation, you provide a navigation path based on those key values. The underlying Xamarin Forms navigation system relies on the type of the page for navigation. The awesome thing for us is that Prism abstracts that glue away to simple string values so that you can move your navigation calls into your view model with the rest of the business logic. And you can mock the navigation service for unit testing.
In our case, our navigation stack will be the master detail page, the navigation page and then the actual content page. We end up passing the navigation service a string value such as “/MasterPage/NavPage/DashboardPage”. Prism parses the path into segments and looks up each in the container. It sees that the MasterPage is a MasterDetailPage and knows that the next segment should be put in the Detail section of the page. It then sees that this page is a navigation page, so it knows to put the final page, the DashboardPage, into the content of the navigation page. The navigation service also handles the other possible scenarios such as tabs and modal displays.
Back To MvbMasterPageViewModel
With the help of the NavigationService, the MvbMasterPageViewModel is performing most of the navigation in the app, so we need to do our navigation relative to the master page. Each of our menu items will have a navigation path of “NavPage/DestinationPage”. As there is no leading “/” character, the navigation service knows that it is a relative path and will figure it out relative to itself.
Sometimes you need to specify XAML that is specific to the platform. Xamarin Forms already has a special class to help with this called OnPlatform. But I find that it isn’t always granular enough to handle the different instances of Windows: Windows, Windows Phone, Windows Tablet and Xbox. We can define our own custom handler to help us with this.
It looks like the following in XAML.
<!--
here is the declaration in the content page attributes:
xmlns:h="clr-namespace:AppName.Helpers"
-->
<Label Text="Display Custom Platform Styling">
    <Label.Margin>
        <h:OnCustomPlatform
            x:TypeArguments="Thickness"
            Android="5,40"
            iOS="10,20"
            Windows="20"
            WinPhone="4,8,4,8"
            WinTablet="12,8,12,8"
            Xbox="40" />
    </Label.Margin>
</Label>
A couple of things about the above code: the h: refers to the namespace that contains our OnCustomPlatform class. The other thing to note is that I don’t know if the Device and TargetIdiom objects in Xamarin Forms work with the Xbox, so use with caution if you are going to try this with an Xbox app.
How the Class Works
using Xamarin.Forms;

public sealed class OnCustomPlatform<T>
{
    public T Android { get; set; } = default(T);
    public T iOS { get; set; } = default(T);
    public T WinPhone { get; set; } = default(T);
    public T Windows { get; set; } = default(T);
    public T WinTablet { get; set; } = default(T);
    public T Xbox { get; set; } = default(T);
    public T Other { get; set; } = default(T);

    public static implicit operator T(OnCustomPlatform<T> p)
    {
        switch (Device.RuntimePlatform)
        {
            case Device.Android:
                return p.Android;
            case Device.iOS:
                return p.iOS;
            case Device.Windows:
                if (Device.Idiom == TargetIdiom.Desktop)
                    return p.Windows;
                else if (Device.Idiom == TargetIdiom.Phone)
                    return p.WinPhone;
                else if (Device.Idiom == TargetIdiom.Tablet)
                    return p.WinTablet;
                else if (Device.Idiom == TargetIdiom.TV)
                    return p.Xbox;
                else
                    return default(T);
            default:
                return p.Other;
        }
    }
}
And that is all there is. It is actually surprisingly simple to do though I admit, after a while it gets pretty verbose the more complex you get with your page.
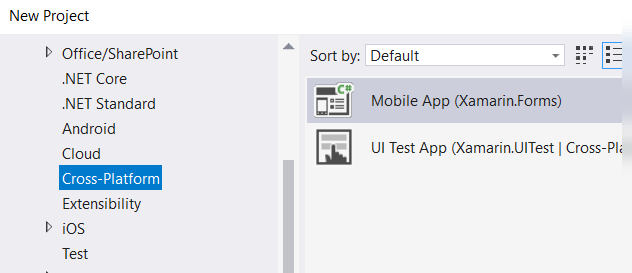
In my Xamarin Forms vs PWA experiment, I thought I would get started with Xamarin Forms first. The first thing we are going to do is create the project. For those that don’t know, you can find the Xamarin Forms project templates under cross-platform in the category tree on the left.
Next you will have to select the type of project. I prefer to use the blank app template and the platforms depend on what I am doing. I find that even if I don’t need a UWP app, I select it anyways as I find it easiest for debugging. I am also a fan of using the standard library for the common code instead of the shared project: you are only compiling the shared project once instead of including it to be compiled for each of the clients. But both work so use whatever you prefer.
Alright, so after we let it restore all of the necessary packages, we can get started. If you have read any of my other posts, you know that I am a big fan of the work that the team with Prism Library do, and back it up with a Patreon pledge (if you love Prism, you should consider it as well). So the next step will be to setup Prism with my app.
Adding Prism
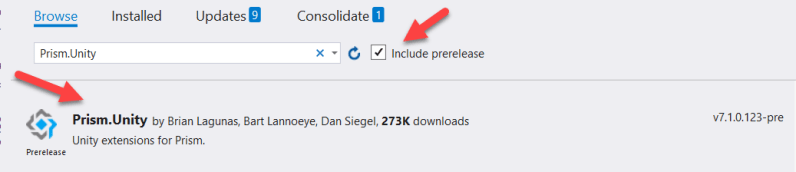
The easiest thing to do here is obviously to use NUGET to add Prism to your project. You can search for Prism.Unity and that will bring in the packages that use Unity.Container as the dependency injection container.
I should note here that I am going to use the pre-release version of the packages. As such, I am going to go to the GitHub repository and download the packages and use them in my workspace. Go to the 7.1.0-Pre tag to download the latest that I used. Why would I download and include the projects manually? If you haven’t done this before, I would recommend trying it sometime with a library of your choice. If you are relying on a package of some kind, I think it is a good idea to have at least a base understanding of how things are working within the code that you are relying on. And if something isn’t working as expected, it is pretty easy to step right into the library code itself and see what is going on. This is the first time that I have used the 7.x version of Prism so I want to see what the changes are.
If you do download the source and add it to your project manually, you will have to include the projects in your solution. Once they are in the solution, remember to go the core project and each of the platform projects and add them as project references.
Bootstrapping Your App
If you have done any Xamarin Forms projects in the past, you know that there is an Application object that is used to start up your app. This object is contained in the core project common to all the platforms. We are going to change our Application object to derive from the PrismApplication object. If you are poking around, you will probably find a PrismApplicationBase object in the Prism.Forms assembly and a PrismApplication object in the Prism.Unity.Forms assembly. We want to use the one that is derived for the container of our choice: Unity.Container.
Head on over to your core project and open up the App.xaml file. You are going to need to update the root tag to be PrismApplication and do that you will need to add the appropriate namespace to the XAML namespace declarations. Your XAML would then look like the following:
Don’t forget the code behind. In addition to change the base class, Prism imposes a pair of methods that you must define: RegisterTypes and OnInitialized. First, let’s fix up the class declaration and the constructor. For now, ignore the IPlatformInitializer, we will talk more about that in another post.
public partial class App : PrismApplication
{
    public App(IPlatformInitializer initializer = null)
        : base(initializer)
    {
    }

    /// ...
}
The RegisterTypes method is used to register all the navigation pages that the navigation service uses and all of the services that you want to consume in your app. An example might be the service that calls an external web api. Although we haven’t gotten to that point yet, this sample project will call a web api that gets data from the local transit authority. We will see that a bit later.
For now, all we want to do is to register our pages for navigation, of which we only have one.
That was pretty easy. If we had a view model for our MainPage defined yet, we could also register it as part of the above call. And then whenever the navigation service created the page, it would also create the view model and inject it for us.
Next, we look at the OnInitialized function. This gets called after all of the initialization has happened and your app is ready to show the first page. For us it will be very simple, we just call the base class InitializeComponent method and then ask the navigation service to go the first page.
In the above, the NavigationService looks for the page type that you registered against the “main” key, creates it and pops it up on to the Xamarin Forms navigation stack. Just to make sure everyone grasps the coolness part of the navigation service, you perform your navigation using arbitrary strings, therefore your objects are not coupled together and it is dead easy to swap in new pages without affecting the rest of your code.
Excellent! This should get you going with a shell app that you can run on each of the platforms that you created for. Once caveat though: I sometimes find Visual Studio to be a bit finicky when you start changing the XAML base class in the app object. I usually find that some combination of cleaning the solution and restarting Visual Studio clears this up, so be aware of that. Since I specified a UWP project as well, I haven’t tried to open it up in Visual Studio for Mac to see if that is less fragile. Once Visual Studio wraps its mind around it though, you should be good to go.
Next thing we will look at is adding in our master/detail, hamburger menu and place holder pages for the different options on the menu.
Happy new year everyone! Hopefully everyone had a good holidays (if that is your thing) and have come back refreshed, relaxed and ready for a new year. For my first post of 2018, I was going to switch it up from development and go into a bit of dev ops.
I was fortunate to see Donovan Brown present earlier this week at Microsoft Vancouver. It was a great presentation and demo and left me inspired to put some of those lessons to good use with one of my current projects, a .NET desktop addin.
Background
I am using Visual Studio Team Services Online for hosting my code repos, managing my backlog and bugs, but I haven’t made much use of the build systems. Setting up a build definition to build and run my unit test was pretty easy, and I was able to just use defaults for the most part.
But I had some struggles with how to automate the signing of the binaries. Afer doing some research on it, here is what I found and what worked for me.
Step 1
First we need to create a script of some kind to perform the actual signing of the files. I chose to use Powershell as I have never really worked with it before. In my Visual Studio solution directory I created a “build” folder and added the script there.
param($certFile, $pw, $buildDir)

Write-Host "****************************************"
Write-Host "****************************************"
Write-Host "*** S I G N I N G O U P U T ***"
Write-Host "****************************************"
Write-Host "****************************************"

Write-Host $buildDir
Write-Host $certFile

$exe = Get-ChildItem -Path "C:\program files (x86)\Windows Kits" -Recurse -Include signtool.exe | select -First 1
Write-Host $exe

$timestampUrl = "http://timestamp.comodoca.com/rfc3161"

ForEach ($file in (Get-ChildItem $buildDir))
{
  if ($file.Extension -eq ".dll")
  {
    Write-Host $file.FullName
    &$exe sign /f $certFile /p $pw -tr $timestampUrl $file.FullName
  }
  elseif ($file.Extension -eq ".exe")
  {
    Write-Host $file.FullName
    &$exe sign /f $certFile /p $pw -tr $timestampUrl $file.FullName
  }
}
So what is happening here? First thing is that this script takes three parameters:
– the location of the certification file
– the password for the certificate
– the build directory
We will look at how we get those parameters later during the task.
The first important thing the script does is locate the signing tool on the build agent. We know that it will be somewhere under the “C:\program files (x86)\Windows Kits” subdirectory, so we use the Get-ChildItem to recurse through that directory and return the first one it finds. It stores that location in a variable to be used later.
The next thing it doesis loop through the build directory for all of the .exe and .dll files. For each that it finds, it uses the sign tool, and the supplied certificate path and password to perform the signing.
The nice thing about the script above is that there is nothing in there that is project dependant. You can use this script on all of your projects.
Step 2
Next I had to upload my code signing certificate to VSTS. This is pretty easy to do, all you have to do is click on “Build and Release” on your menu, then click on “Library” and then “Secure Files”. Finally click on “+ Secure file” and upload your certificate.
Step 3
Head over to your build definition by clicking “Builds” and then “Edit” from the build definition menu.
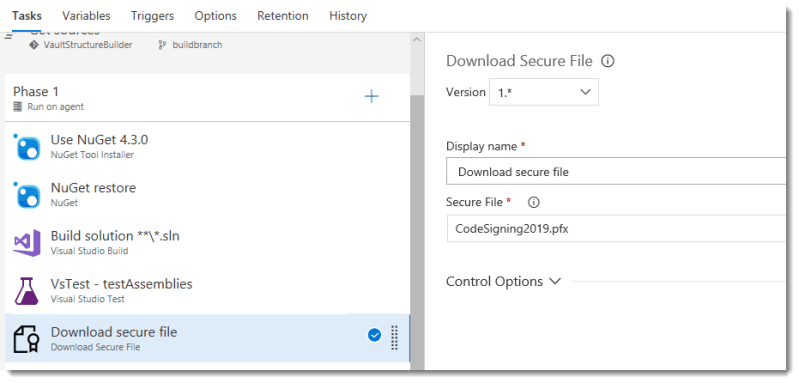
We are going to add a new task called “Download secure file”. You can give the task some kind of descriptive name, and then from the “Secure File” combo box, select your code signing certificate. I placed this task after the Test task.
Now, if your tests pass, the build process will download the code signing certificate to your build host (either online or local). You should note that the build agent will clean up after itself.
Step 4
You need to add your certificate password to the list of variables for the build definition. In your build definition, click on variables and then “add” in the “Process Variables” group. Give your secret a name and provide the value. Don’t forget to click on the padlock to hide the value.
Once you save the build definition, the secret value is hidden. From the capture above you can see that I am unlocking my password and it doesn’t show the value.
Step 5
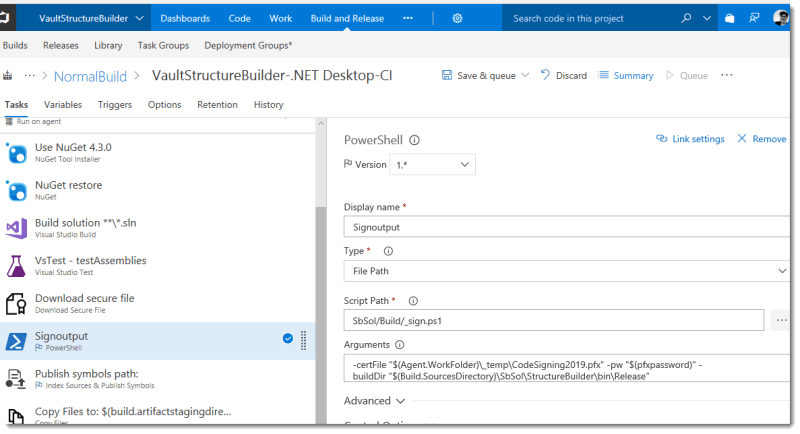
Finally, we just need to execute the script as a task in the build. Add a powershell task after the “download secure file” task that you created in step 3. You can make the type “File Path” and browse to the build script that we created in step 1 (remember to check it in). Next we need to add the arguments that the script is expecting.
Certificate file
The download secure files tasks dumps the files into the build agent work folder _temp directory. So the first parameter is “$(Agent.WorkFolder)_temp\CodeSigning2019.pfx”
Password
The process variable contains our password, and to reference it as a parameter for our script, we uses “$(pfxpassword)”. “pfxpassword” is the name in my build definition.
Build Output Directory
Finally we need to specify where the files that are to be signed are located. We use another built in variable. For my build definition it looks like this: “$(Build.SourcesDirectory)\SbSol\StructureBuilder\bin\release”
Setup Complete
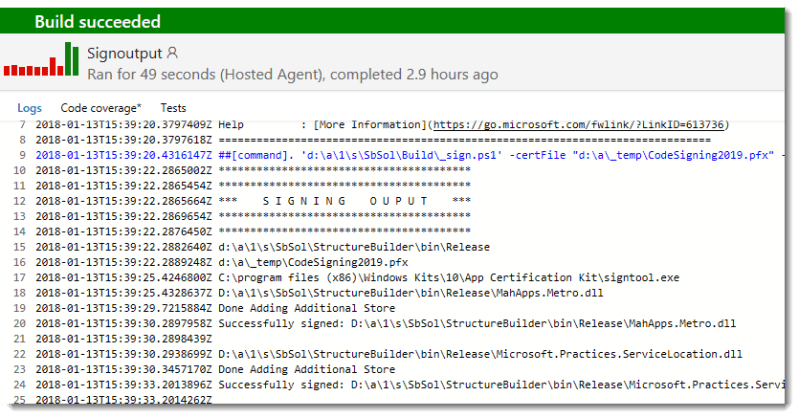
And that is it. Now when your build is run, you should see the following output in the logs.
You can see where the script is started, it is the blue line. Notice that the password has been blanked out on the command line. You can see next that it is showing the location of the build directory and the certificate file and even the signtool.exe that it found on the build machine. Next you can see it looping through all of the output files and the output of the signing operation.
Wrapping up
That is how I did it. Seeing as I use Visual Studio for building my Xamarin Forms apps as well, I could probably do something similar to sign that output.