
Welcome
Happy new year everyone! Hopefully everyone had a good holidays (if that is your thing) and have come back refreshed, relaxed and ready for a new year. For my first post of 2018, I was going to switch it up from development and go into a bit of dev ops.
I was fortunate to see Donovan Brown present earlier this week at Microsoft Vancouver. It was a great presentation and demo and left me inspired to put some of those lessons to good use with one of my current projects, a .NET desktop addin.
Background
I am using Visual Studio Team Services Online for hosting my code repos, managing my backlog and bugs, but I haven’t made much use of the build systems. Setting up a build definition to build and run my unit test was pretty easy, and I was able to just use defaults for the most part.
But I had some struggles with how to automate the signing of the binaries. Afer doing some research on it, here is what I found and what worked for me.
Step 1
First we need to create a script of some kind to perform the actual signing of the files. I chose to use Powershell as I have never really worked with it before. In my Visual Studio solution directory I created a “build” folder and added the script there.
param($certFile, $pw, $buildDir)

Write-Host "****************************************"
Write-Host "****************************************"
Write-Host "*** S I G N I N G O U P U T ***"
Write-Host "****************************************"
Write-Host "****************************************"

Write-Host $buildDir
Write-Host $certFile

$exe = Get-ChildItem -Path "C:\program files (x86)\Windows Kits" -Recurse -Include signtool.exe | select -First 1
Write-Host $exe

$timestampUrl = "http://timestamp.comodoca.com/rfc3161"

ForEach ($file in (Get-ChildItem $buildDir))
{
  if ($file.Extension -eq ".dll")
  {
    Write-Host $file.FullName
    &$exe sign /f $certFile /p $pw -tr $timestampUrl $file.FullName
  }
  elseif ($file.Extension -eq ".exe")
  {
    Write-Host $file.FullName
    &$exe sign /f $certFile /p $pw -tr $timestampUrl $file.FullName
  }
}
So what is happening here? First thing is that this script takes three parameters:
– the location of the certification file
– the password for the certificate
– the build directory
We will look at how we get those parameters later during the task.
The first important thing the script does is locate the signing tool on the build agent. We know that it will be somewhere under the “C:\program files (x86)\Windows Kits” subdirectory, so we use the Get-ChildItem to recurse through that directory and return the first one it finds. It stores that location in a variable to be used later.
The next thing it doesis loop through the build directory for all of the .exe and .dll files. For each that it finds, it uses the sign tool, and the supplied certificate path and password to perform the signing.
The nice thing about the script above is that there is nothing in there that is project dependant. You can use this script on all of your projects.
Step 2
Next I had to upload my code signing certificate to VSTS. This is pretty easy to do, all you have to do is click on “Build and Release” on your menu, then click on “Library” and then “Secure Files”. Finally click on “+ Secure file” and upload your certificate.

Step 3
Head over to your build definition by clicking “Builds” and then “Edit” from the build definition menu.
We are going to add a new task called “Download secure file”. You can give the task some kind of descriptive name, and then from the “Secure File” combo box, select your code signing certificate. I placed this task after the Test task.
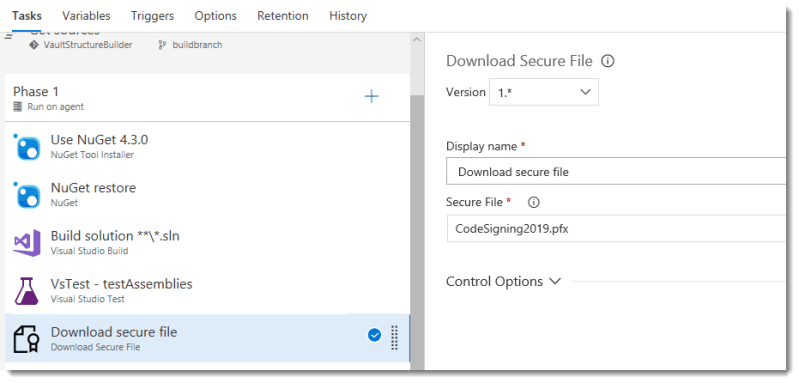
Now, if your tests pass, the build process will download the code signing certificate to your build host (either online or local). You should note that the build agent will clean up after itself.
Step 4
You need to add your certificate password to the list of variables for the build definition. In your build definition, click on variables and then “add” in the “Process Variables” group. Give your secret a name and provide the value. Don’t forget to click on the padlock to hide the value.
Once you save the build definition, the secret value is hidden. From the capture above you can see that I am unlocking my password and it doesn’t show the value.
Step 5
Finally, we just need to execute the script as a task in the build. Add a powershell task after the “download secure file” task that you created in step 3. You can make the type “File Path” and browse to the build script that we created in step 1 (remember to check it in). Next we need to add the arguments that the script is expecting.
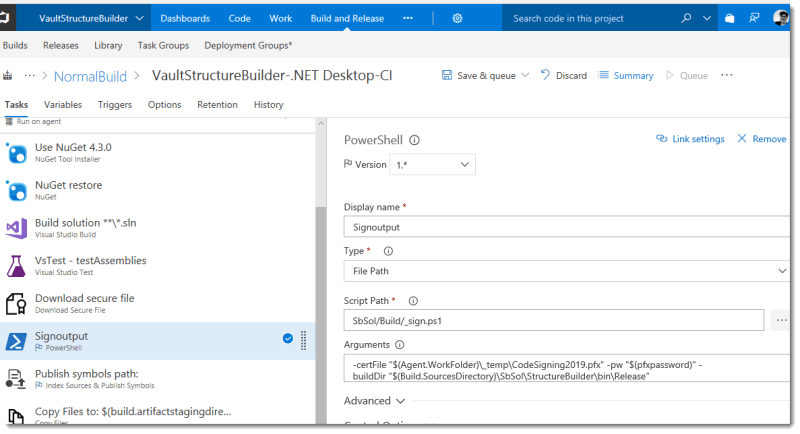
Certificate file
The download secure files tasks dumps the files into the build agent work folder _temp directory. So the first parameter is “$(Agent.WorkFolder)_temp\CodeSigning2019.pfx”
Password
The process variable contains our password, and to reference it as a parameter for our script, we uses “$(pfxpassword)”. “pfxpassword” is the name in my build definition.
Build Output Directory
Finally we need to specify where the files that are to be signed are located. We use another built in variable. For my build definition it looks like this: “$(Build.SourcesDirectory)\SbSol\StructureBuilder\bin\release”
Setup Complete
And that is it. Now when your build is run, you should see the following output in the logs.
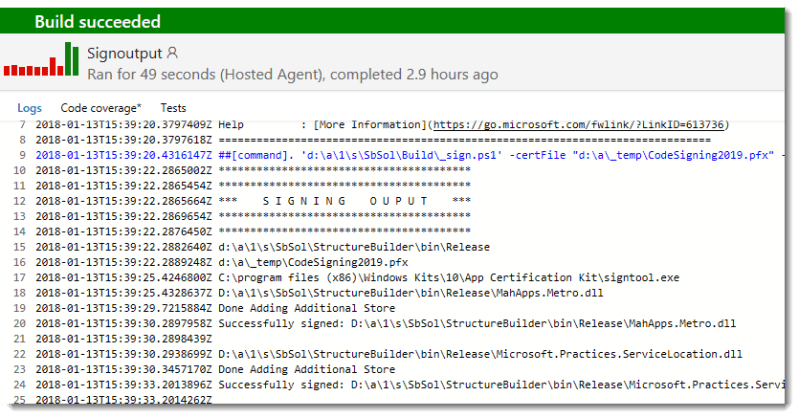
You can see where the script is started, it is the blue line. Notice that the password has been blanked out on the command line. You can see next that it is showing the location of the build directory and the certificate file and even the signtool.exe that it found on the build machine. Next you can see it looping through all of the output files and the output of the signing operation.
Wrapping up
That is how I did it. Seeing as I use Visual Studio for building my Xamarin Forms apps as well, I could probably do something similar to sign that output.
