
One of the goals that I gave myself this year was to start improving on my public speaking. It is something that I often find difficult and I wished to improve. So earlier this year, I did a presentation to the Vancouver Windows Platform Development meetup group, and it was on developing a UWP app with a hamburger style menu and using the Prism framework.
I think it went pretty well, and I learned a lot, and not just on public speaking. Giving the presentation meant I had to dig into the framework more than I normally would to learn why things were done a certain way, and how they were done. There is a lot of great stuff to learn in Prism.
I had used Prism previously for regular WPF desktop apps before and was pretty happy with it. If you are unfamiliar with the library, here is an abbreviated history: it was started by the Microsoft Patterns and Practices Teams as a WPF library to help show developers how to architect apps in a modular and maintainable manner. Along the way it added support for Silverlight, Windows Phone and Windows Universal. After version 5, it was released out into the community to maintain and enhance. Silverlight, Windows Phone and Windows Universal were dropped and Universal Windows Apps and Xamarin Forms were added. In addition to keeping your app maintainable, it also helps out with common patterns such as MVVM, messaging, logging and dependency injection. It also helps out with platform specific things such as navigation.
I have had the idea of doing a series of posts on using Prism with Xamarin Forms for a while now, and was stuck on a suitable demo project. During the Xamarin Dev Day hands on lab, I came up with the idea of converting that app into a Prism app. At first, I will stick to the basics and then maybe follow up with some more detailed posts on specific subjects such as navigation and view model injection.
The first thing we are going to do here is take the dev days sample app and build it up to where it gets the list of speakers and shows the details of the selected speaker. I have it setup in the following repository https://github.com/MichaelPonti/XamarinPrism under DevDaysSpeakers. If you clone the repository, restore packages and build the droid app, you should be able to load the list of dev days speakers and navigate to their detail page.
Note: I am just going to stick to the droid project and not show iOS or UWP.
Next what we will do is add in the nuget packages for Prism and then fix up the App object.
When using Prism, your first need to decide what kind of dependency injection you are going to use. I always seem to default to Unity: it was the first container that I had used and has always worked well for me. Out of the box, Prism comes with Unity, Ninject, AutoFac and DryLoc. Pick the one that you like and go with it, or, use something else if you want to put in a bit of extra effort. Let’s add Prism.Unity.Forms as shown below:
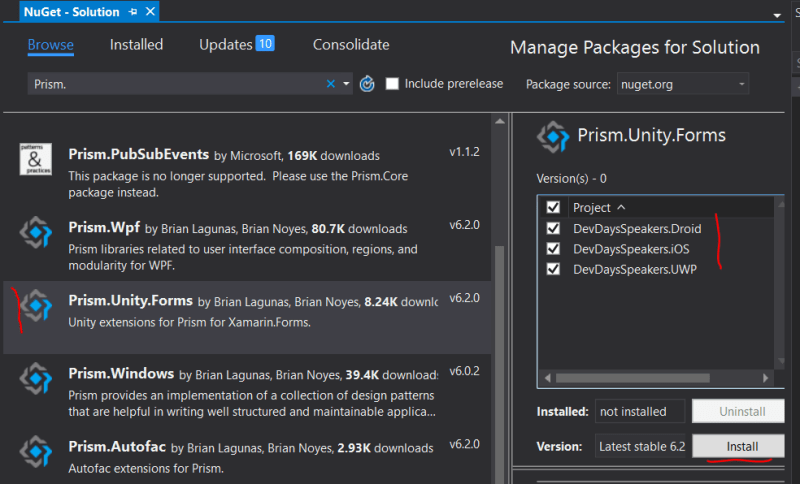
Add nuget package to projects in solution.
Adding Prism.Unity.Forms will add in the following items to your projects:
- Prism.Unity.Forms
- Prism.Unity
- Prism
- Microsoft.Practices.Unity
- Microsoft.Practices.ServiceLocation
Now that we have Prism installed in the app, let’s setup our App object (located in the shared portion of the solution). If you were at one of the dev days, or have done any Xamarin Forms in the past, you know the app class is the main entry point. Each of the platform specific projects will jump into the app object to get at the cross-platform code.
The easiest thing to do is to just comment out the existing class and replace it with the following:
public class App : PrismApplication
{
    public App(IPlatformInitializer initializer = null)
        : base(initializer)
    {
    }

    protected override void OnInitialized()
    {
        NavigationService.NavigateAsync("SpeakersPage");
    }

    protected override void RegisterTypes()
    {
        Container.RegisterTypeForNavigation<View.SpeakersPage>();
    }

    protected override void OnSleep()
    {
        base.OnSleep();
    }

    protected override void OnResume()
    {
        base.OnResume();
    }
}
So what do we have up there? Use the OnInitialized to handle tasks once the App is up and running. At the very least, we are going to navigate to the first page here. The other important piece is the RegisterTypes function. In here we will register our services and also our pages for navigation. For now, all we are going to do is register the SpeakersPage.
If you run the app now, you should find that it starts up and displays the main page. If you click on the button, that should still function as well. At this point, it will crash if we try to navigate to the details page of one of the listed speakers.
We have a pretty good start here and it is time to wrap up. I have decided to talk about the MVVM support Prism provides first instead of fixing the navigation crash. One of the nice things about Prism is that it abstracts navigation away from knowing page types and moves navigation into the view model. So we will get our view model setup first.
Stay tuned for step 02!

Pingback: Xamarin Dev Days Lab – Prism Step 3 – random bits and bytes